Today we are going to some programmatic Prompt Engineering on ChatGPT to craft some code the quick and easy way. ChatGPT has been a boon to programmers and taking the programming world by storm, producing bug-free code which would otherwise take ages to debug.
In my short use with ChatGPT so far, I am impressed, though it has some styles, habits and quirks which I am going to share in this article. Here is a summary of my take backs so far on ChatGPT 3.5 as of the March 2023 version.
ChatGPT nature as your companion programmer
- Understands and distinguishes between programmatic concepts
- Able to code is any common language
- Excellent code scrubber/proofer
- Output code runs and is bug free
- Continuity issues- tend to forget and rewrite prior suggested code
In a nutshell, ChatGPT has the coding competency of a junior-medium software developer who is able to understand and distinguish between programmatic concepts and has very good code-proofing. Also, these are strengths you should use the AI as part of your coding workflow. Prompt Engineering thereafter comes in to tailor ChatGPT generic outputs into something customised to what you actually need.
Program tasks to code in-hand
Using a recent coding example to demonstrate the AI quirks, I was looking for ChatGPT to write me a set of code which I can use to automatically extract HTML elements of interest from my photo gallery source code. Thereafter, it will then phrase the relevant parts and display them on a local web-UI which I can subsequently conveniently caption for export for my blog.
On my available options, I initially had a rough idea of using server-side PHP to extract a form input and phrasing out to a HTML page. Also, using a mix of PHP’s preg_match() and simple HTML DOM parser functions. However, this involves using server GET and POST calls which requires some variable hardening especially when parsing to server-end. Hence, a better solution is to run this completely client-end.
That be the best case scenario, and ChatGPT will get bonus points if the processing can be done completely front end on-client. Hence, I reckon coding in Javascript allows you to run it completely on-client within your browser session.
Starting prompt: Setting the stage
Let’s start by kicking off with an initial prompt to set the context and frame boundaries of the stage. First we let ChatGPT understands the programming languages we are intending to use, namely HTML and Javascript. Here, lets get it going with an idea of what you expect to see as an output using simple loops for a start.
Write me a block of html and javascript code to input large raw html code into a textarea. Also extract the input into an array text between specific HTML tags. In a for-loop, print the array output into HTML to display on the page.
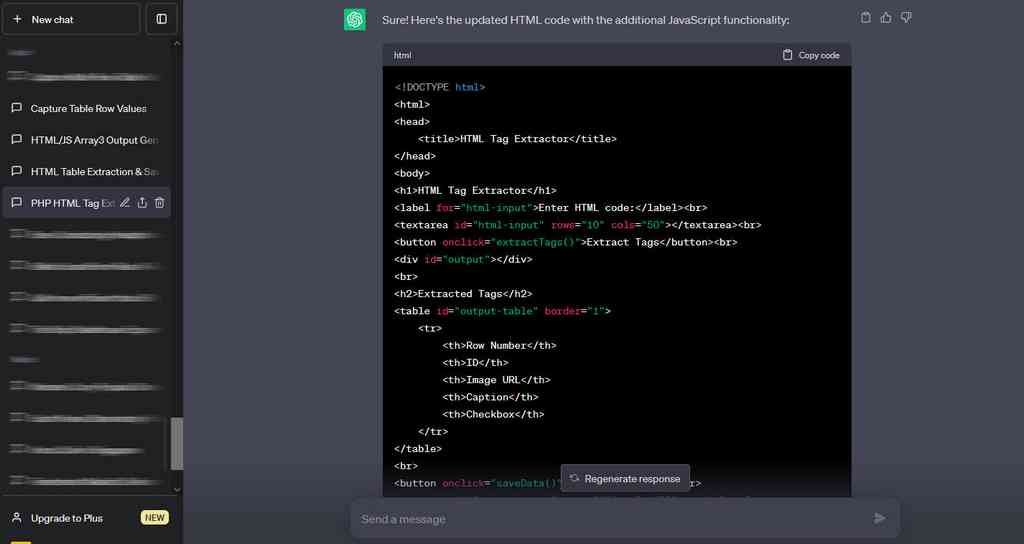
In this example, ChatGPT understand HTML form elements as well as Javascript functions. Also, the AI recommended an iterator returned by the “matchAll()” method of the input string, and a for loop is used to iterate over the matches and concatenate the extracted text into a string variable called “output”. Also, this can be called anytime using the “extractTags()” function, retrieving the input code from the textarea using the “value” property of the textarea element. This results in the following first batch of code:
Code Blob 1:
<h1>HTML Tag Extractor</h1>
<label for=”html-input”>Enter HTML code:</label><br>
<textarea id=”html-input” rows=”10″ cols=”50″></textarea><br>
<button onclick=”extractTags()”>Extract Tags</button><br>
<div id=”output”></div>
<script>
function extractTags() {
a const htmlInput = document.getElementById(“html-input”).value;
const startTag = “<tag>”;
b const endTag = “</tag>”;
const regex = new RegExp(`${startTag}(.*?)${endTag}`, “g”);
c const matches = htmlInput.matchAll(regex);
d const outputDiv = document.getElementById(“output”);
let output = “”;for (const match of matches) {
output += match[1] + “<br>”;
}
outputDiv.innerHTML = output;
}
</script>
Moreover, this outputs presents a simple input form which extracts the bunch of my pasted HTML sample code, with the output extracted and appended via lines below. Also, this is about 70% of the functionalities I wanted upfront, albeit some room for some formatting customisation. Not bad for a first prompt try!

Moreover, ChatGPT like a good teacher, outputs some accompanying explanation on parts of its recommended code and how it’s functions work. However, you can safety ignore it and focus your time understanding the functionality of the core code itself.
Here, from Code Blob1 above, the user inputs HTML code into a textarea with the id “html-input”. Additionally, when the “Extract Tags” button is clicked, the JavaScript function “extractTags()” is called. Also, here, the start and end HTML tags to extract text between are defined as variables, and a regular expression is created using these variables to find all matches of text between the specified tags. Finally, the “innerHTML” property of a div with the id “output” is set to the value of the “output” variable, which displays the extracted text on the page.
Defining and Refining your starting prompts
Furthermore, defining and refining prompts is essential to ensure that ChatGPT generates your desired output. Additionally, it is critical to define prompts in a way that is specific and detailed enough to provide ChatGPT with the necessary information to customise output to your needs. Additionally, I like to display the output into a table element, with content allowing me to edit the photo captions.
Improve on the above code to output to an array variable instead. Each array entry comprises of two parts delimited by “|” consisting of a title followed by an image URL. Also write me additional block javascript code from an array to print to a html table the array and printing the two parts: first with the title in an “input field” as column one and the image in column 2. Have a checkbox on column 3 “checked”.
Engineering this new ChatGPT Prompt, this results in the following new output, with the working code below.
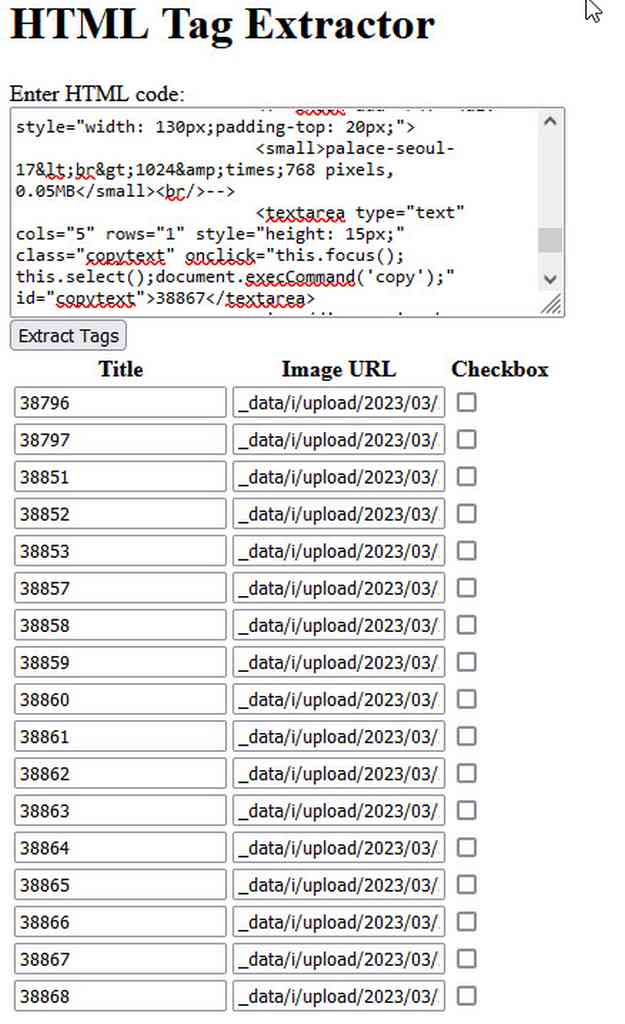
Interestingly, with this new prompt, ChatGPT understand that the table output function needs to be rewritten. Also, the result now prints out a 3-column HTML table, it appends additional row data via a new displayDataInTable() function as shown in ChatGPT output code in Code Blob 2 below:
Code Blob 2:
<h2>HTML Tag Extractor</h2>
<label for=”html-input”>Enter HTML code:</label><br>
<textarea id=”html-input” rows=”10″ cols=”50″></textarea><br>
<button onclick=”extractTags()”>Extract Tags</button><br>
<div id=”output”>
<h2>Extracted Data</h2>
<table id=”data-table” border=”1″>
<thead>
<tr>
<th>Title</th>
<th>Image URL</th>
<th>Checkbox</th>
</tr>
</thead>
<tbody id=”data-table-body”></tbody>
</table>
<p id=”row-count”></p>
<p id=”checked-row-count”></p>
</div>
<script>
const extractedData = [];
function extractTags() {
a const htmlInput = document.getElementById(“html-input”).value;
b const startTag = “<tag>”;
c const endTag = “</tag>”;
d const regex = new RegExp(`${startTag}(.*?)${endTag}`, “g”);
const matches = htmlInput.matchAll(regex);
extractedData.length = 0; // Clear previous data
for (const match of matches) {
d const title = match[1].split(“|”)[0].trim();
const imageUrl = match[1].split(“|”)[1].trim();
extractedData.push({ title, imageUrl, checked: false });
}
displayDataInTable();
}
function displayDataInTable() {
const tableBody = document.getElementById(“data-table-body”);
tableBody.innerHTML = “”;
extractedData.forEach((data, index) => {
a const row = document.createElement(“tr”);
b const titleCell = document.createElement(“td”);
const titleInput = document.createElement(“input”);
titleInput.type = “text”;
c titleInput.value = data.title;
titleInput.oninput = (event) => {
extractedData[index].title = event.target.value;
};titleCell.appendChild(titleInput);
row.appendChild(titleCell);
const imageUrlCell = document.createElement(“td”);
const imageUrlInput = document.createElement(“input”);
imageUrlInput.type = “text”;
imageUrlInput.value = data.imageUrl;
imageUrlInput.oninput = (event) => {
extractedData[index].imageUrl = event.target.value;
};imageUrlCell.appendChild(imageUrlInput);
row.appendChild(imageUrlCell);
const checkboxCell = document.createElement(“td”);
const checkboxInput = document.createElement(“input”);
checkboxInput.type = “checkbox”;
checkboxInput.checked = data.checked;
checkboxInput.onchange = (event) => {
extractedData[index].checked = event.target.checked;
displayDataInTable();
};
Also, I require a total photo count so I won’t miss out any missing photos, indicated with this additional prompt statement:
Resulting in the following additional code continuing from the above:
Code Blob 2 (continued):
checkboxCell.appendChild(checkboxInput);
row.appendChild(checkboxCell);
tableBody.appendChild(row);
});document.getElementById(“row-count”).textContent = `Total Rows: ${extractedData.length}`;
const checkedRowCount = extractedData.filter((data) => data.checked).length;
document.getElementById(“checked-row-count”).textContent = `Total Rows Checked: ${checkedRowCount}`;
}
</script>
A rather good code proofer
ChatGPT is a great tool to proof your code of errors. What amazes me is the level of code proofing ChatGPT delivers. Also, ChatGPT and raw code runs well in first try. This is quite unheard of in the programming world and little time is spent. Even with seasoned human developers, rarely in my 10 years of software experience where raw untested code can work on the first try.
Moreover, refining prompts over time can improve the quality of the generated code, such as structuring the extractTags() function to output into a 3 column table instead of just dumping the output into a string. Also, on my subsequent prompts, I noticed ChatGPT streamlined the regex function into one simple line to extract content between <tag> and </tag>:
It shows ChatGPT interesting thought process where it will “subconsciously streamline code” as you Iteratively refine prompts is a crucial part of the prompt engineering process. Also, interestingly, the scary thing is that the code actually works, and involves little testing, but more on evaluating the generated code logic to identify areas for improvement.
Additionally, this involves adjusting the input and output formats, from ChatGPT responses and making changes as necessary. Also, you can provide feedback to ChatGPT to correct mistakes and refine the model further, though I reckon most of us won’t have much time for that.
Leave no ambiguity in your prompts
Moreover, just like all programmers, myself included, ChatGPT can get lazy in producing the simplest code for the job (keep it simple stupid). However, it won’t necessarily give you the output you are expecting.
In this latest output example, I didn’t like ChatGPT tabulating the checked row count one time, where unchecking it does not update the counts. Also, looks like ChatGPT took the easy way out from my prompt! This leads onto iteratively Refining Prompts in ChatGPT.
This involves refining the specifics of the delimiter:
improve on the above code to output to an array variable instead. Each array entry comprises of two parts delimited by “|” consisting of a “id” followed by an “image URL”. Also write me additional block javascript code from an array to print to a html table the array and printing table column 1 first in running number sequence, column 2 with the “id” in an “input field”, column 3 as an image printing the “image URL” using “img” tags with width=”160″ height=”120″. Have an input field called “caption” on column 4 and have a checkbox on column 5 “checked”. Also print a count at the bottom of total number of rows. Print another count of number of rows with the checkbox on column 5 “checked”.
Be specific and thorough on variable data structures
Also, I wish to be more specific in what makes up the array content used to store and display the variables, rather than using ChatGPT’s sloppily implementation by two separate arrays calls ArrayA and ArrayB.
Add an additional function button to above code to capture all checkbox unchecked column 2 and 4 values to save into an array “ArrayA” and print. Also capture all checkbox “checked” column 3 and 4 values to save print into another array “ArrayB”.
Putting it all together
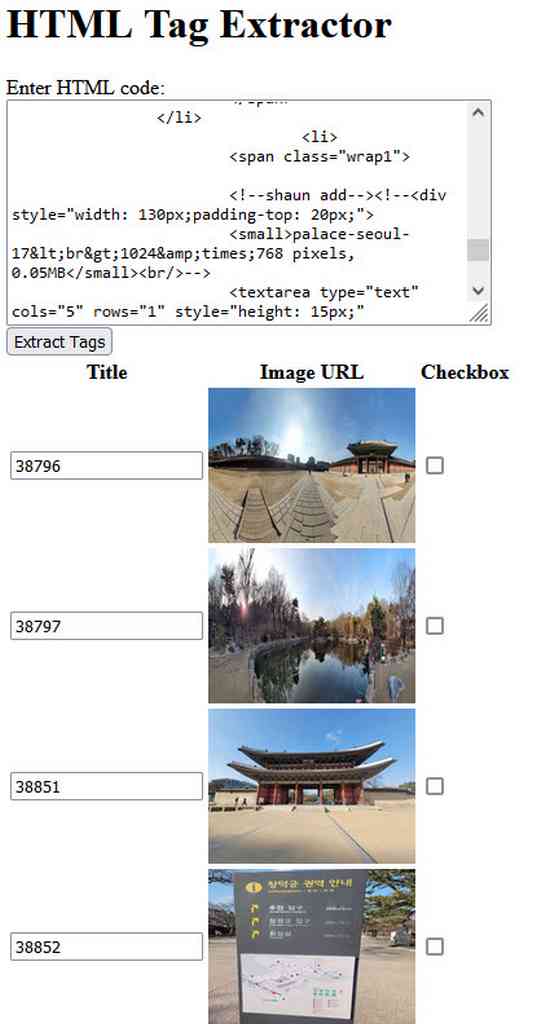
Hence, this results in the eventual final code output below, with the HTML visuals as above. Also, interestingly, with this new prompt, ChatGPT rewrote the table output function, with a constant defined for each column element now in the generateTable() function.
Code Blob 3:
<h2>HTML Table Generator</h2>
<h2>Input HTML:</h2>
<textarea id=”html-input” rows=”10″ cols=”80″></textarea>
<br>
<button onclick=”extractTags()”>Extract Tags</button>
<br>
<h2>Output Table:</h2>
<div id=”output”></div>
<br>
<h2>Row Count:</h2>
<button onclick=”saveData()”>Save Data</button>
<span id=”total-count”></span><br>
<span id=”checked-count”></span><br>
<span id=”Array3RowCount”>ArrayA Sets:</span>
<h2>ArrayA Output:</h2>
<textarea id=”output-a” rows=”10″ cols=”80″></textarea><br>
<h2>ArrayB Output:</h2>
<textarea id=”output-b” rows=”10″ cols=”80″></textarea><br>
<script>
a let dataArray = []; // Array to store extracted data
b let ArrayA = []; // Array to store unchecked values
let ArrayB = []; // Array to store checked values
const totalCount = 0;
function extractTags() {
dataArray = []; // Clear dataArray before extraction
const htmlInput = document.getElementById(“html-input”).value;
a const startTag = ‘<tag>’;
const endTag = ‘</tag>’;
b const regex = new RegExp(`${startTag}(.*?)${endTag}`, “g”);
const matches = htmlInput.matchAll(regex);
for (const match of matches) {
const parts = match[1].split(“|”);
c const id = parts[0].trim();
const imageUrl = parts[1].trim();
dataArray.push({ id, imageUrl });
}
generateTable(); // Generate HTML table
}
function generateTable() {
const table = document.createElement(“table”);
const tbody = document.createElement(“tbody”);
c const outputDiv = document.getElementById(“output”);
outputDiv.innerHTML = “”; // Clear previous output
let rowNumber = 1; // Row number counter
for (const data of dataArray) {
a const row = document.createElement(“tr”);
b const cell1 = document.createElement(“td”);
const cell2 = document.createElement(“td”);
c const cell3 = document.createElement(“td”);
const cell4 = document.createElement(“td”);
d const cell5 = document.createElement(“td”);
e const inputId = document.createElement(“input”);
inputId.type = “text”;
inputId.value = data.id;
const img = document.createElement(“img”);
img.src = “https://shaunchng.com/photos/”+data.imageUrl;
img.width = 160;
img.height = 120;
f const inputCaption = document.createElement(“input”);
inputCaption.type = “text”;
const checkbox = document.createElement(“input”);
checkbox.type = “checkbox”;
e checkbox.checked = true;
checkbox.addEventListener(“change”, function() {
updateCounts();
if (this.checked) {
if (!ArrayB.some(item => item.id === data.id)) {
ArrayB.push(data);
}
}else{
ArrayB = ArrayB.filter(item => item.id !== data.id);
}
});
cell1.textContent = rowNumber;
cell2.appendChild(inputId);
cell3.appendChild(img);
cell4.appendChild(inputCaption);
cell5.appendChild(checkbox);
row.appendChild(cell1);
row.appendChild(cell2);
row.appendChild(cell3);
row.appendChild(cell4);
row.appendChild(cell5);
tbody.appendChild(row);
rowNumber++;
}
table.appendChild(tbody);
outputDiv.appendChild(table);
updateCounts(); // Print row count
}
ChatGPT also included a new function updateCounts() to separately determine the number of checkboxes are checked to distinguish the output.
Code Blob 3 (continued):
function updateCounts() {
const totalCount = dataArray.length;
a const uncheckedCount = ArrayB.length;
const checkedCount = totalCount – uncheckedCount;
b const totalCountSpan = document.getElementById(“total-count”);
const checkedCountSpan = document.getElementById(“checked-count”);
totalCountSpan.textContent = `Total Rows: ${totalCount}`;
checkedCountSpan.textContent = `Checked Rows: ${checkedCount}`;
if (uncheckedCount % 3 === 0) {
document.getElementById(“Array3RowCount”).innerHTML = `<span style=”color: green;”>Unchecked Rows: ${uncheckedCount}</span>`;
}else{
document.getElementById(“Array3RowCount”).innerHTML = `<span style=”color: red;”>Unchecked Rows: ${uncheckedCount}</span>`;
}}
In addition, let’s be specific on the output for the code to produce, encapsulating our caption output tags with custom HTML wrapper tags:
From ArrayA output: outout each array line starting with “<html start>”, followed by the data.id value, then “<html mid>”, data.caption value, and ending each row with “<html end>” tag.For every 3 rows of the above output, group the output and append with HTML code “<div start>” and closing with “<div end>”. Also print the output separated by linebreaks in a textarea box.
ArrayB: Each row has 5 elements, start each row with “<html start>”, followed by the data.imageUrl value, then “<html mid>”, data.caption value and ending each row with “<html end>” tag. Also, print the output separated by linebreaks in another textarea box.
Which give this following new encapsulated wrapper output in this re-engineered prompt:
Code Blob 3 (continued):
function saveData() {
ArrayA = dataArray.filter(item => !ArrayB.find(data => data.id === item.id));
const outputA = ArrayA.map(data => `<html start>${data.id}<html mid>${data.caption}<html end>`).join(“\n”);
g const outputB = ArrayB.map(data => `<html start>${data.imageUrl}<html mid>\
${data.caption}<html end>`).join(“\n”);
const textareaA = document.getElementById(“output-a”);
textareaA.value = outputA;
const textareaB = document.getElementById(“output-b”);
textareaB.value = outputB;
}
</script>
Not too shabby for 30 minutes of ChatGPT Prompt Engineering, the code works and does what I need it to do. Typically, such a program task might take me half a day to initially code and another half day to a second day to refine and debug any code errors. Remarkably, ChatGPT allowed me to churn out this code with working code ready for production in a faction of the time.
So that wraps up the coding examples. Let me leave you with a summary some miscellaneous tips in closing.
ChatGPT has quite the Goldfish memory
Additionally, ChatGPT can be rather forgetful. This is another one gripe I faced when refining the code after 4-5 prompts down. Here, ChatGPT tends to “forget” the code it has previously posted and produce completed unrelated code by rewriting the code with completely different function and code styles.
Also, this will make incremental code enhancements difficult. In this case as the continuity is broken, it is recommended to backtrack, and enhance and resubmit your upstream prompts for ChatGPT to regenerate a whole new set of code.
Continuing the output after ChatGPT Stops Abruptly
Moreover, ChatGPT has an output limit for each prompt reply. This is due to a system token limit, which is limited to 4096 tokens for GPT-3. Hence, when you code output is too long (not necessarily complex), many at times, ChatGPT will stop its output abruptly.
Also, I found this tend to happen on long output typically beyond around 80 lines or 3374 chars. Notably, you also get this limit even on the paid subscription version of ChatGPT, where you only get benefits of service access priority during influx of peak users, response rates and first-hand access to new features.
Use “continue” at your own risk
Sometimes ChatGPT may stop the output abruptly, leaving you with incomplete code. But fret not, you can get it to continue your output by simply entering “Continue” in your next prompt. But when you do, ChatGPT will however, forget the formatting between text and code, and would mistakenly output your code using a mix of plain text and code-formatted text. Also, you will have to copy the output manually and piecing it together, ensuring that your encapsulation and nesting are intact.
Moreover, there might also be a risk that ChatGPT might potentially lose crucial content or vital context from earlier prompt conversations. Also, you can tell when the model starts outputting nonsensical or repeated responses duplicated from your earlier response. This might break your code or at worse generate garbage code which can’t compile or run.
Breaking into components to tackle separately
In such a case, this is where I will recommend you to backtrack to your previous prompt and tackle your code prompts into separate smaller sub-tasks segments or by component functions. Alternatively, you can prompt ChatGPT to output only the changes to your code instead of having it re-output the entire code, which is bound to exceed the output restriction. Moreover, you need to be specific on the logic to tackle separately or you would have to spend time integrating back into your master code. Also, for writing, the way around this token limit issue is to truncate or omit unessential inputs to limit your output text.
Suggestion-wise to OpenAI, besides increasing the token limit for next ChatGPT releases, it be good if there is a way to point to ChatGPT their past responses via a “reference pointer” to maintain the context and to keep conversations going. Also, this could be done via context windows IDs or history tokens references to help ChatGPT understand the context and generate more coherent responses.
ChatGPT Prompt Engineering: In Conclusion
All in all, that wraps up our short experience using ChatGPT for programming using the art of tailored prompts. Prompt engineering itself is an art which comes with more practice, where you get to understand the tricks and temperament of the system with each iteration release.
Today, I find ChatGPT an essential tool in every programmer’s toolbox. The ability to produce accurate working code and explanations for beginners is unheard of. One which one day could even render programming sites like stack-overflow or even developer conferences in Singapore obsolete.
Lastly, these ChatGPT Prompt Engineering techniques and strategies outlined in this article can apply not just to coding and programming tasks, but general tasks like writing too. Also, this is also what makes it interesting as it is an ever and fast evolving scene which will change the way we can quickly automate work and increase our productivity in the future.
In summary here are your take backs for Programmatic Prompt Engineering on ChatGPT
- Start off thinking of an “prompt plan”- breaking large tasks into smaller parts to tackle separately.
- Be specific and thorough, leave no ambiguity in your prompts, especially how you define your data structures.
- To minimise abrupt output limits, tackle expected large outputs in different parts for continuity and piece it together at the end.